
Recipes
Basque Burnt Cheesecake: Creamy Center, Deeply Caramelized Top
Prep
25 min
Cook
40–50 min
Total
7 h 15 min including cooling and chilling
Servings
8
Difficulty
Medium
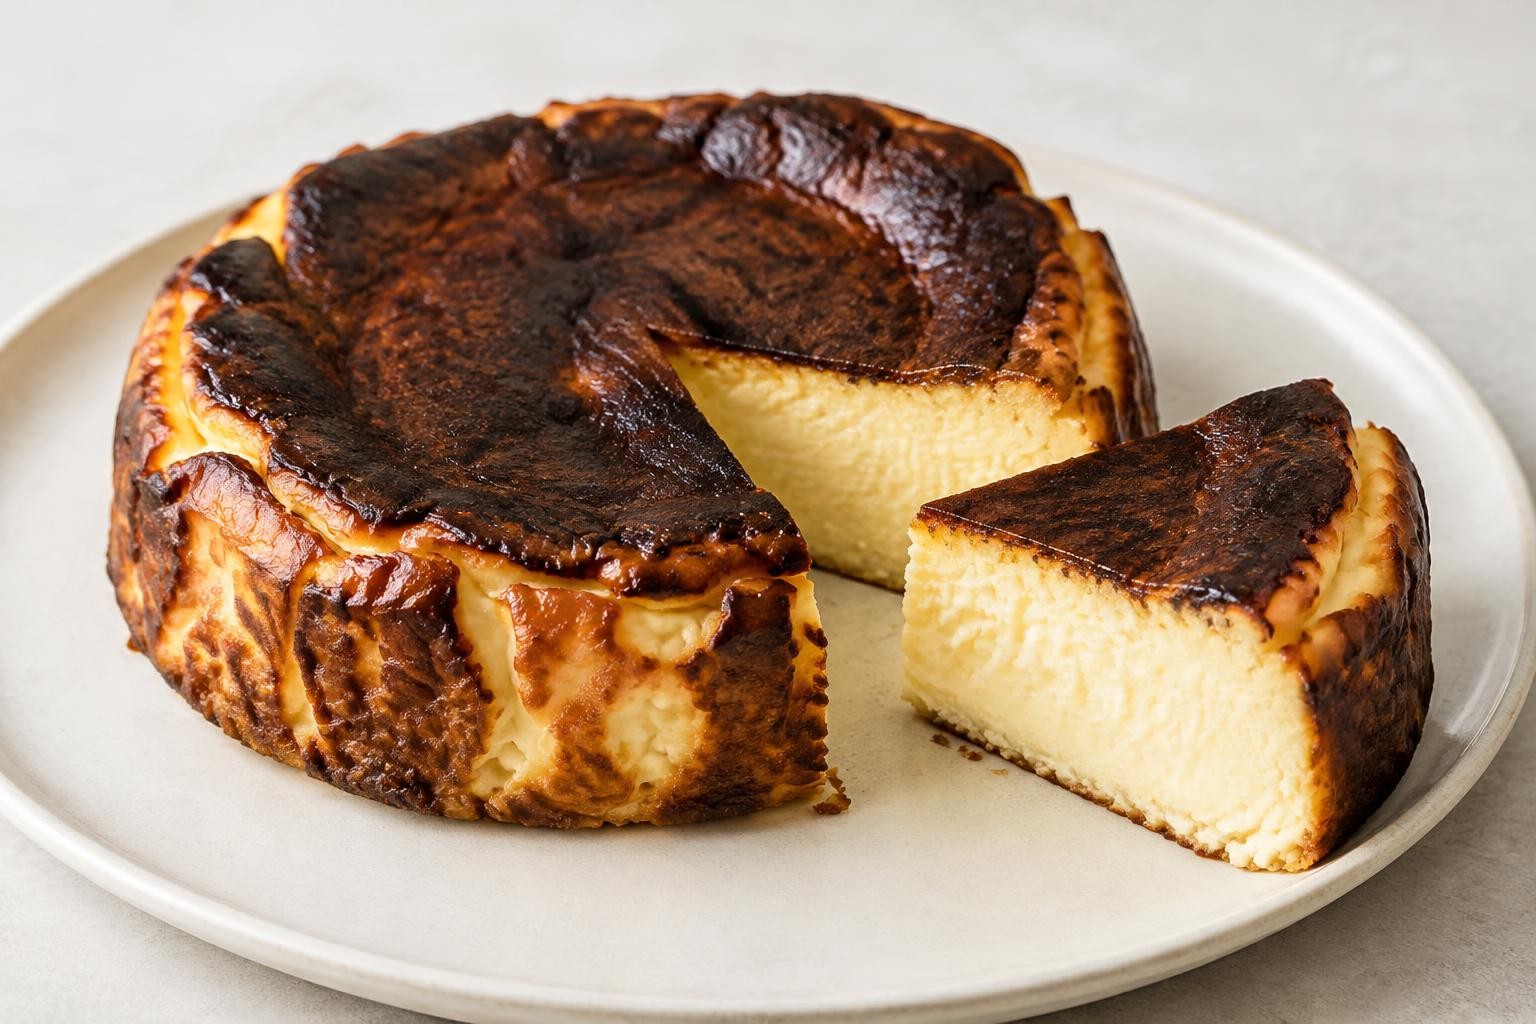
Basque burnt cheesecake is the dessert that turns a familiar baking instinct upside down. Instead of protecting a cheesecake from color, you deliberately bake it hot enough to develop a dark, aromatic top. Its center remains creamy and softly set, and its edges rise in dramatic folds against parchment paper. The result is not a burnt mistake; it is the balance between caramelized surface and tender interior that makes this style memorable.
This version is made in a 20 cm / 8 in round springform pan with full-fat cream cheese, heavy cream, eggs and sugar. It does not need a biscuit crust or a water bath. It does need patience: the center continues to set as it cools, and refrigeration makes the slices easier to cut. An hour in the oven is not a shortcut to a ready-to-eat cheesecake.
The goal here is a richly browned top, not actual charcoal. A little variation is normal because ovens and pans differ. Use the visual cues below rather than relying only on the clock.
Recipe details
- Prep
- 25 min
- Cook
- 40–50 min
- Total
- 7 h 15 min including cooling and chilling
- Servings
- 8
- Difficulty
- Medium
- Category
- Recipes
- Diet
- Vegetarian (lacto-ovo)
- Portion size
- 1 of 8 slices
Ingredients
For one 20 cm / 8 in cheesecake
To prepare the pan
Method
Prepare the equipment and cheese
Step 1: Take the cream cheese, eggs and cream out of the refrigerator 45–60 minutes before mixing. Room-temperature ingredients blend more readily and reduce the risk of lumps.
Step 2: Position a rack in the middle or slightly lower part of the oven and preheat to 220°C / 425°F. Allow the oven to heat thoroughly; a short preheat can make the browned surface unpredictable.
Step 3: Put the springform pan on a sturdy baking tray. Check that the pan latch is closed tightly and the tray fits the oven before filling it.
Step 4: Crumple the parchment sheets, open them out and press them into the pan in overlapping layers. Push them firmly against the base and sides, allowing folds, and leave at least 5 cm of parchment above the rim.
Step 5: If the parchment keeps springing out of position, use a tiny smear of butter or oil on the pan underneath. The parchment should prevent direct contact between batter and metal.
Mix a smooth, low-air batter
Step 6: Put the softened cream cheese in a large bowl. Beat on low speed, or stir firmly with a spatula, until smooth with no visible firm lumps. Avoid whisking aggressively.
Step 7: Add the sugar in two additions, mixing after each until it begins to dissolve and the cheese looks glossy. Scrape the base and sides of the bowl thoroughly.
Step 8: Add the eggs one at a time, mixing slowly just until each disappears before adding the next. Excess air can cause dramatic rising followed by collapse.
Step 9: Pour in the room-temperature cream in a thin stream while mixing on low speed. Stop when the batter is uniform; it should be pourable but richer than ordinary cake batter.
Step 10: Sprinkle over the sifted flour and salt, followed by the vanilla if using. Mix just long enough to remove flour streaks, then scrape the bowl once more.
Step 11: Check for lumps. If the mixture still has small bits of cream cheese, briefly pass it through a fine-mesh sieve into a clean bowl instead of beating it for several more minutes.
Step 12: Pour the batter into the parchment-lined pan. Gently tap the pan once or twice on the work surface to release large trapped bubbles; do not bang it repeatedly.
Bake at high heat
Step 13: Slide the baking tray and pan onto the prepared oven rack. Avoid placing the cheesecake directly against the upper heating element.
Step 14: Bake for 30 minutes without opening the door. The surface should begin turning golden, with darker patches developing as the cake rises.
Step 15: At 35 minutes, inspect through the oven glass. The edges should be relatively set and lifted, while the center may still wobble when the pan is gently nudged.
Step 16: Continue baking for about 40–50 minutes total, depending on your oven, until the top is a deep brown rather than pale beige. Reduce the oven temperature slightly only if the surface is scorching before the middle sets.
Step 17: To assess the center more objectively, an instant-read thermometer inserted carefully into the middle should approach **71°C / 160°F**. This is a useful safety target for an egg-rich custard; avoid repeatedly puncturing the cake.
Step 18: Remove the tray carefully using oven mitts. The parchment, pan and filling are extremely hot. The cheesecake may still wobble gently at the center; it will firm further as it cools.
Cool, chill and slice
Step 19: Leave the cheesecake in its pan on a cooling rack until no longer hot, about 1–2 hours. Refrigerate within 2 hours of removing it from the oven, and chill at least 4 hours, preferably overnight, before slicing.
Step 20: Unclip the springform, peel down the parchment gently and cut with a clean knife dipped in hot water and wiped dry between slices. For the softest texture, let each portion stand briefly at room temperature before serving, without leaving dairy-rich cheesecake out for prolonged periods.
Tips
- Room-temperature cheese matters. Cold cream cheese resists blending, creating lumps that become noticeable in the finished slice. If it is still firm, leave it a little longer before mixing.
- Use the pan size specified. In a larger pan, the batter becomes shallower and sets faster; in a smaller pan, it may climb above the lining or require extra baking time. This recipe intentionally disables automatic serving scaling.
- Parchment is part of the look. The rustic folds are characteristic. Overlap the sheets generously and leave plenty above the rim so the batter never spills over the top.
- A dark top is intentional, but black ash is not. You want deep toasted notes without an acrid burnt smell. Adjust the oven if the surface colors far too quickly.
- Don't overbeat the eggs. Too much air produces a larger initial puff and a more uneven collapse. Mix gently and scrape often.
- Sift the flour. Even a small amount can form dry spots in a thick cream-cheese mixture.
- Use a tray. Springform pans can leak a little; a rimmed baking sheet protects the oven floor.
- Chill before slicing. A hot cheesecake can look underdone because its center has not finished setting. Refrigeration transforms the texture and gives cleaner slices.
- Interpret the wobble carefully. A gentle central jiggle is expected; batter sloshing like a liquid is not. When uncertain, use the thermometer once and finish the bake if needed.
- Expect sinking. A little deflation is characteristic and should not be “fixed” by adding more flour.
Variations
Vanilla-forward cheesecake
Use 2 teaspoons of vanilla extract instead of one. Keep the rest of the formula unchanged; strong additions of liquid flavoring can influence the filling texture.
Citrus-scented version
Add finely grated zest from one washed lemon or orange. Use only the colored zest and avoid the bitter white pith. Do not add large amounts of juice, which change the acidity and liquid balance.
Coffee variation
Dissolve 2 teaspoons of instant espresso powder in 1 tablespoon of warm cream taken from the measured amount, cool it, then add with the remaining cream. This emphasizes the toasted surface flavor.
Gluten-conscious variation
A small amount of cornstarch may replace the 20 g flour, but it changes the set and is not a tested one-to-one guarantee. For guests with celiac disease, verify that every ingredient is certified appropriately and avoid cross-contact; do not rely on this text as proof a dish is gluten-free.
What makes Basque cheesecake different?
Traditional baked cheesecakes usually use moderate heat to avoid browning and cracking. Basque-style cheesecake is intentionally baked hotter. The top takes on a deep mahogany color while the middle remains moist. The unlined-looking, folded sides are created by deliberately crumpling and pressing parchment into the pan rather than smoothing it flat.
The eggs bind the filling as they cook; the cream and cheese contribute fat and water for a soft texture. Flour, used here in a small quantity, adds a little stability without making the center cake-like. Because the cake rises and deflates somewhat during cooling, a crack or a slightly sunken center is normal rather than evidence of failure.
Before you start: the pan and temperature
Use a round 20 cm (8 in) springform pan, ideally around 7 cm deep. A taller pan helps contain the rising batter. Line the base and sides with two large sheets of baking parchment that overlap, and leave at least 5 cm above the rim; the cake can puff significantly. Place the springform on a rimmed baking tray to catch possible drips.
Preheat the oven thoroughly to 220°C / 425°F using conventional top-and-bottom heat. If your oven runs hot or has strong fan circulation, you may need a slightly lower setting; do not assume that a fan oven behaves exactly like a conventional oven. Position a rack in the middle or slightly below so the top can color without touching a heating element.
Serving ideas
Basque cheesecake is satisfying without decoration. Its flavor moves between tangy dairy, subtle vanilla and the slightly bitter edge of caramelization. Serve small wedges on plain plates and let the browned top remain visible.
If you want an accompaniment, choose something that contrasts rather than competes: a few fresh raspberries, lightly sweetened roasted strawberries or espresso. Heavy chocolate sauce can hide the defining flavor of the surface. For a dinner party, cut the cake in advance while chilled and plate just before serving.
Storage and food safety
Refrigerate: cover and refrigerate within 2 hours after baking. Store at 4°C / 40°F or below and use within about 3–4 days for best quality. Cover tightly to prevent the cheesecake from absorbing refrigerator odors.
Freeze: slices can be wrapped individually, sealed well and frozen for around 1–2 months for good eating quality. Thaw overnight in the refrigerator. Freezing may slightly change the creamy texture, but the cake remains pleasant when properly wrapped.
Serve: avoid leaving this dairy- and egg-rich dessert on a buffet for hours. Set out only what will be eaten promptly and return leftovers to refrigeration.
Troubleshooting
The top is pale, but the middle is set
Your oven may have been underheated, the rack may be too low or the cake may have been baked at too gentle a temperature. Next time, verify the oven temperature with a thermometer and follow the high-heat method. Don't repeatedly broil a fully set cake; it may dry the center.
The top is very dark before the middle cooks
Some ovens have strong overhead heat. Lower the rack or the temperature slightly and allow a longer bake. A darker surface is desirable, but strong burnt bitterness is not.
The batter has visible white lumps
The cream cheese was too cold or the bowl was not scraped adequately. Warm the ingredients properly next time, mix the cheese smooth before adding eggs and strain the batter if necessary.
The cheesecake collapsed
Some sinking is normal as trapped steam escapes and the creamy filling sets. A severe crater paired with a wet, liquid interior suggests insufficient baking, excess air or an inaccurate oven temperature.
The texture is dry and grainy
It may have baked too long or at excessive heat. Remove the cake when the top is deeply colored and the center is set enough to pass the temperature and wobble checks, rather than waiting for the middle to become fully firm in the oven.
FAQ
It should taste deeply toasted and slightly bittersweet on top, not like charcoal. The interior remains creamy and mildly tangy. If the surface tastes acrid, it was overbrowned.
No. A water bath suppresses browning and is unnecessary for this style. Line a sturdy pan with parchment and bake directly on a tray.
It is not recommended for the same result. Lower-fat products tend to contain different amounts of moisture and stabilizers and can change how the cake sets.
The cheesecake rises substantially while baking. Tall parchment helps hold the batter and keeps the folded, rustic shape. It also prevents sticking around the edges.
You can taste a small portion once it has cooled safely, but the center will be much softer and harder to slice. For clean wedges and the intended custardy texture, chill at least four hours.
One day ahead is ideal. Cooling and chilling overnight gives the center enough time to settle and makes serving much easier.
Not as written: it contains wheat flour. Substituting the flour might produce a wheat-free variation, but ingredients and cross-contact must be assessed for any medical dietary requirement.
Pan diameter, batter depth and heat penetration strongly influence the final set. Scaling up the ingredients without reworking the pan and baking conditions can create an unsafe or disappointing result.
Editorial note: This recipe describes a research-informed method and does not claim a physical kitchen test. Results depend on oven calibration, ingredient temperature and pan geometry.
Nutrition
Nutrition information is not available for this recipe yet.
Reviews
There are no reviews for this recipe yet.
TastyFlavors Team
The editorial team behind TastyFlavors, sharing recipes, techniques and inspiration for everyday cooking.