
Recipes
One-Pot Creamy Mushroom Pasta with Garlic and Thyme
Prep
15 min
Cook
25 min
Total
40 min
Servings
4
Difficulty
Easy
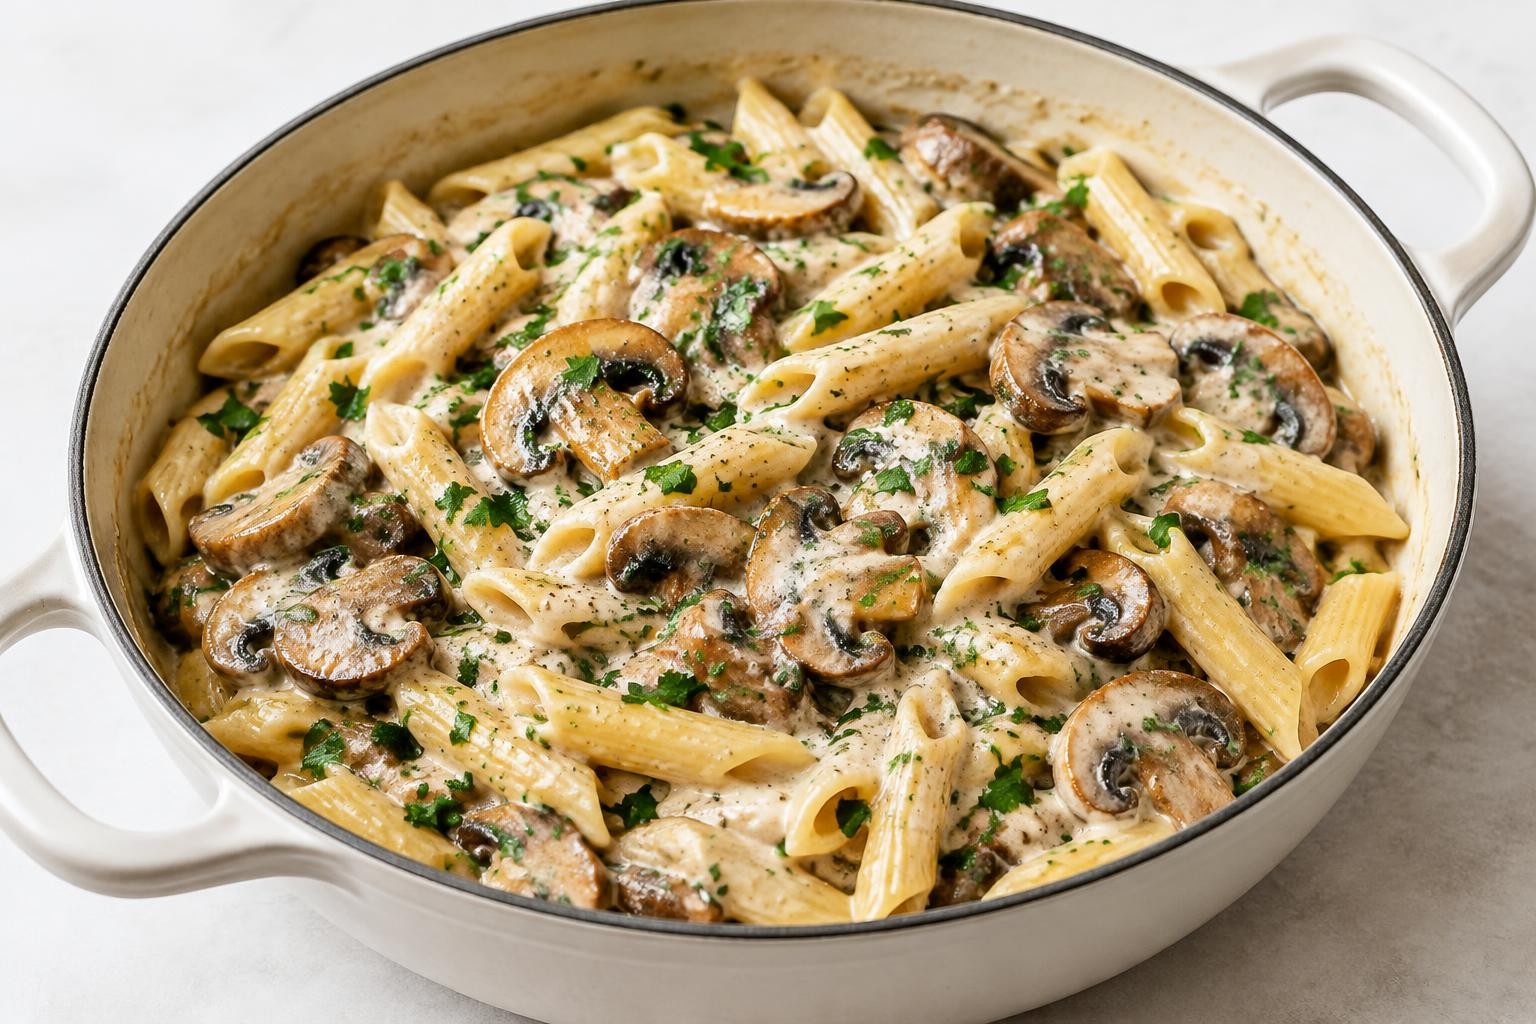
A good creamy mushroom pasta does not need a separate pot of boiling water and a sink full of dishes. In this one-pot version, the pasta finishes cooking directly in a flavorful combination of sautéed mushrooms, onion, garlic and stock. The starch released by the noodles helps the sauce cling to every bite, while a modest amount of cream gives it a smooth finish.
The key is to brown the mushrooms before adding liquid. Mushrooms hold a great deal of water. If they are crowded or covered at the start, they release that water and steam instead of developing a savory golden surface. Once they have browned, they add much more depth to a relatively simple sauce.
This method is designed for a wide, heavy-bottomed sauté pan with a lid, or a medium Dutch oven. The liquid amount is a starting point, not a rigid promise: different pasta shapes, pans and stove settings absorb and evaporate stock differently. Keep a little extra hot water nearby and judge the texture as the pasta cooks.
Recipe details
- Prep
- 15 min
- Cook
- 25 min
- Total
- 40 min
- Servings
- 4
- Difficulty
- Easy
- Category
- Recipes
- Diet
- Vegetarian with vegetable stock and suitable cheese
- Portion size
- one quarter of the finished pasta
Ingredients
For the pasta
Optional flavor additions
Method
Prepare the vegetables
Step 1: Wipe the mushrooms with a slightly damp cloth or soft brush to remove soil. Trim the stem ends and slice the caps and stems about 5 mm thick so they cook evenly.
Step 2: Finely dice the onion and mince the garlic. Measure the cream, pasta and seasonings before starting because the cooking sequence moves quickly once the stock is added.
Step 3: Heat a wide, heavy sauté pan or Dutch oven over medium-high heat. Add the olive oil and, if using, half the butter.
Step 4: Add half the mushrooms in a loose layer. Leave them undisturbed for 2 minutes to encourage browning, then turn and cook another 2–3 minutes until golden patches develop.
Step 5: Transfer the browned mushrooms to a clean bowl. Repeat with the second half, using a small splash of oil only if the pan is completely dry.
Step 6: Return all the mushrooms to the pan. Add the onion and the remaining butter, if using, and cook 3–4 minutes until the onion softens and starts to turn golden.
Step 7: Reduce the heat to medium and add the garlic and thyme. Stir for about 30 seconds, just until fragrant. If the garlic begins darkening rapidly, lower the heat further.
Cook the pasta in the sauce
Step 8: Pour in approximately 150 ml of the warm stock and scrape the pan base with a wooden spoon to lift the browned mushroom bits. This deglazing step gives the sauce extra depth.
Step 9: Add the dried pasta, the remaining measured stock, the initial salt and black pepper. Stir so the pasta is mostly submerged; top up with a little extra hot water only if necessary.
Step 10: Bring the liquid to a gentle boil over medium-high heat, then reduce to a lively simmer. Keep the pan partly covered for the first few minutes if your stove evaporates liquid rapidly.
Step 11: Stir every 1–2 minutes, especially around the corners and base, so the pasta does not form a stuck layer. Scrape gently rather than breaking the pasta.
Step 12: After roughly 8 minutes, taste a piece. It should still be firm at the center. Continue simmering, stirring frequently and checking the liquid level.
Step 13: Add small splashes of the reserved hot water if the pan becomes dry before the noodles are cooked. Use 50–75 ml at a time instead of adding the entire reserve.
Step 14: Continue until the pasta is just tender with a slight bite. Depending on shape and brand, this may take 10–14 minutes from when the liquid began simmering.
Build the creamy finish
Step 15: Lower the heat and stir in the cream. Simmer gently for 1–2 minutes; avoid vigorous boiling, which can make dairy sauces separate or reduce too rapidly.
Step 16: Turn off the heat and add the grated cheese in two additions, stirring until it melts. If the pan is very hot, wait 30 seconds before adding cheese to reduce clumping.
Step 17: Stir in the lemon juice and taste. Adjust the salt, pepper and acidity gradually; the cheese and stock may already contain plenty of salt.
Step 18: Let the pasta stand for 2 minutes, uncovered. The sauce will thicken as the pasta continues absorbing some of the cooking liquid.
Step 19: If the sauce becomes too thick, stir in 1–2 tablespoons of hot water at a time until it coats the pasta easily. If it is too thin, simmer briefly before serving, stirring constantly.
Step 20: Divide among four warm bowls and finish with parsley, a little more grated cheese and optional chili flakes. Serve promptly while the sauce is glossy and fluid.
Tips
- Brown mushrooms in batches. A packed pan traps moisture. The extra batch is worth it for flavor.
- Don't soak mushrooms. Wiping or rinsing quickly and drying is better than leaving them wet in a bowl, since excess surface water delays browning.
- Use a wide pan. The pasta needs space to move. A narrow saucepan makes stirring difficult and promotes sticking.
- Keep hot water nearby. Stock evaporation varies; adding 50–75 ml at a time lets you correct texture without making a watery soup.
- Stir regularly, not constantly. Frequent stirring prevents sticking and helps release starch, but you can still allow a gentle simmer.
- Taste during cooking. Packaging times are a guide, not a guarantee in a concentrated one-pot sauce.
- Add cream near the end. Long boiling can dull the flavor and sometimes destabilize dairy.
- Use finely grated cheese. It melts more readily than thick shavings. Add off the heat for a smoother finish.
- Finish with acid. A teaspoon of lemon juice balances the richness without making the dish taste overtly lemony.
- Serve immediately. Pasta keeps absorbing liquid as it sits, so the sauce is best when freshly finished.
Variations
Add spinach
Stir one large handful of washed baby spinach into the hot pasta just before turning off the heat. It wilts in a minute and adds color without much extra cooking time.
Extra umami without meat
Add 1 teaspoon of white miso near the end, dissolved in a spoonful of warm cooking liquid. Taste before salting because miso is salty. Use a variety suitable for your dietary needs.
Lighter texture
Reduce the cream to 60 ml and add another 60 ml of warm stock. The sauce will be less rich but can still coat the pasta thanks to its natural starch.
With chicken
Cook bite-sized chicken separately and add only after it reaches 74°C / 165°F internally. Keep raw chicken utensils away from the vegetables and pasta. This creates a different, more substantial meal.
Dairy-free version
Omit butter and cheese, choose a plant-based cooking cream that handles heat well, and add a spoonful of nutritional yeast for a savory finish. The flavor and thickness will differ from the dairy version.
Why this one-pot technique works
When pasta cooks in a separate pot, most of its starch ends up in the water that gets poured away. In a one-pot method, that starch remains in the pan and thickens the cooking liquid. As the noodles soften, the stock gradually becomes more concentrated and forms the body of the sauce.
This does not mean the pan should be filled with liquid like a soup. Aim for just enough stock to barely cover the pasta at first; as it cooks, stir and add small splashes if needed. Too much liquid produces a thin sauce, while too little causes the pasta to stick before it reaches the center.
Browning mushrooms first also creates flavor on the base of the pan. The liquid then dissolves those golden bits, transferring their flavor into the sauce without extra ingredients. Garlic goes in after the mushrooms and onion so it does not burn during the longer browning stage.
Which mushrooms and pasta should you use?
Cremini mushrooms (also sold as baby bella or brown button mushrooms) have a pleasantly savory flavor and brown well. Ordinary white button mushrooms also work; cook them long enough to evaporate their moisture. A mixture with shiitake can be delicious, but shiitake stems may be tough and are best removed.
Short pasta shapes such as penne, fusilli or farfalle are especially practical because they fit comfortably in one pan. This recipe uses 300 g dried penne or fusilli. Long spaghetti is possible but often needs a wider pan and more careful stirring. Avoid using fresh pasta without changing the method: it cooks far more quickly and behaves differently.
How to serve
This is a complete main course with a generous mushroom flavor, so keep the accompaniments simple. A bright salad with lemon dressing or quickly steamed broccoli makes the meal feel lighter. Crusty bread is useful for wiping up sauce, though the pasta already provides plenty of starch.
For dinner guests, cook the mushrooms and chop the onion in advance, but finish the pasta shortly before eating. Making the entire dish hours ahead and reheating changes the noodle texture.
Storage and reheating
Refrigerate: cool leftovers promptly, place them in a shallow airtight container and refrigerate within 2 hours. Keep at 4°C / 40°F or below and eat within 3–4 days.
Reheat: warm gently in a saucepan with 2–3 tablespoons of water or stock per portion, stirring until piping hot throughout. A splash of milk or cream can restore richness, but do not boil aggressively.
Freezing: creamy pasta tends to separate and the noodles soften upon thawing. Freezing is possible, but not ideal for texture. If meal-prepping, freeze the browned mushroom base separately and cook fresh pasta when needed.
Troubleshooting
The pasta is still hard and the pan is dry
Add 50–75 ml hot water, stir and continue simmering. Different shapes absorb different amounts of liquid, and a wide pan evaporates stock faster.
The sauce is watery
Leave the lid off, simmer gently and stir for another minute or two. The starch will thicken the liquid as it reduces. Do not add handfuls of cheese to compensate for an excessively wet pan.
The mushrooms are pale
They likely steamed in a crowded or cool pan. Cook them in batches, dry them well and leave them undisturbed long enough to form golden patches.
The cheese formed clumps
The heat may have been too high or the cheese grated too coarsely. Remove the pan from heat and add finely grated cheese gradually while stirring.
The sauce tastes heavy
Add a few drops of lemon and freshly ground pepper, then taste again. Acidity brightens rich sauces more effectively than simply adding extra salt.
FAQ
Yes, if the pan is wide enough and you stir carefully. Spaghetti can clump, and may need slightly different liquid and cooking time. Short pasta is easier for this particular technique.
Yes, but frozen mushrooms usually release more water. Cook them uncovered until the moisture evaporates before trying to brown them.
Milk makes a thinner sauce and can react differently to heat and acid. You can try it, but keep the heat gentle and do not expect the same richness.
It can be, with vegetable stock and cheese made without animal rennet. Check ingredient labels because some hard cheeses are not vegetarian.
Yes, but use a much larger, heavy pot and expect changes in evaporation and timing. This is why the automatic serving adjuster is disabled.
It is best immediately. After cooling, starch continues thickening the sauce; a little hot water or stock helps loosen leftovers during reheating.
Yes. Brown them and refrigerate promptly in a covered container, then finish the recipe with the pasta and stock the next day.
Editorial note: This recipe is instructional and does not claim a physically tested cooking session. Pasta brands, cookware and stove power affect liquid needs and timing.
Nutrition
Nutrition information is not available for this recipe yet.
Reviews
There are no reviews for this recipe yet.
TastyFlavors Team
The editorial team behind TastyFlavors, sharing recipes, techniques and inspiration for everyday cooking.