
Recipes
Crispy Smashed Potatoes: Golden Edges and Creamy Centers
Prep
15 min
Cook
45–55 min
Total
1 h 10 min
Servings
4
Difficulty
Easy
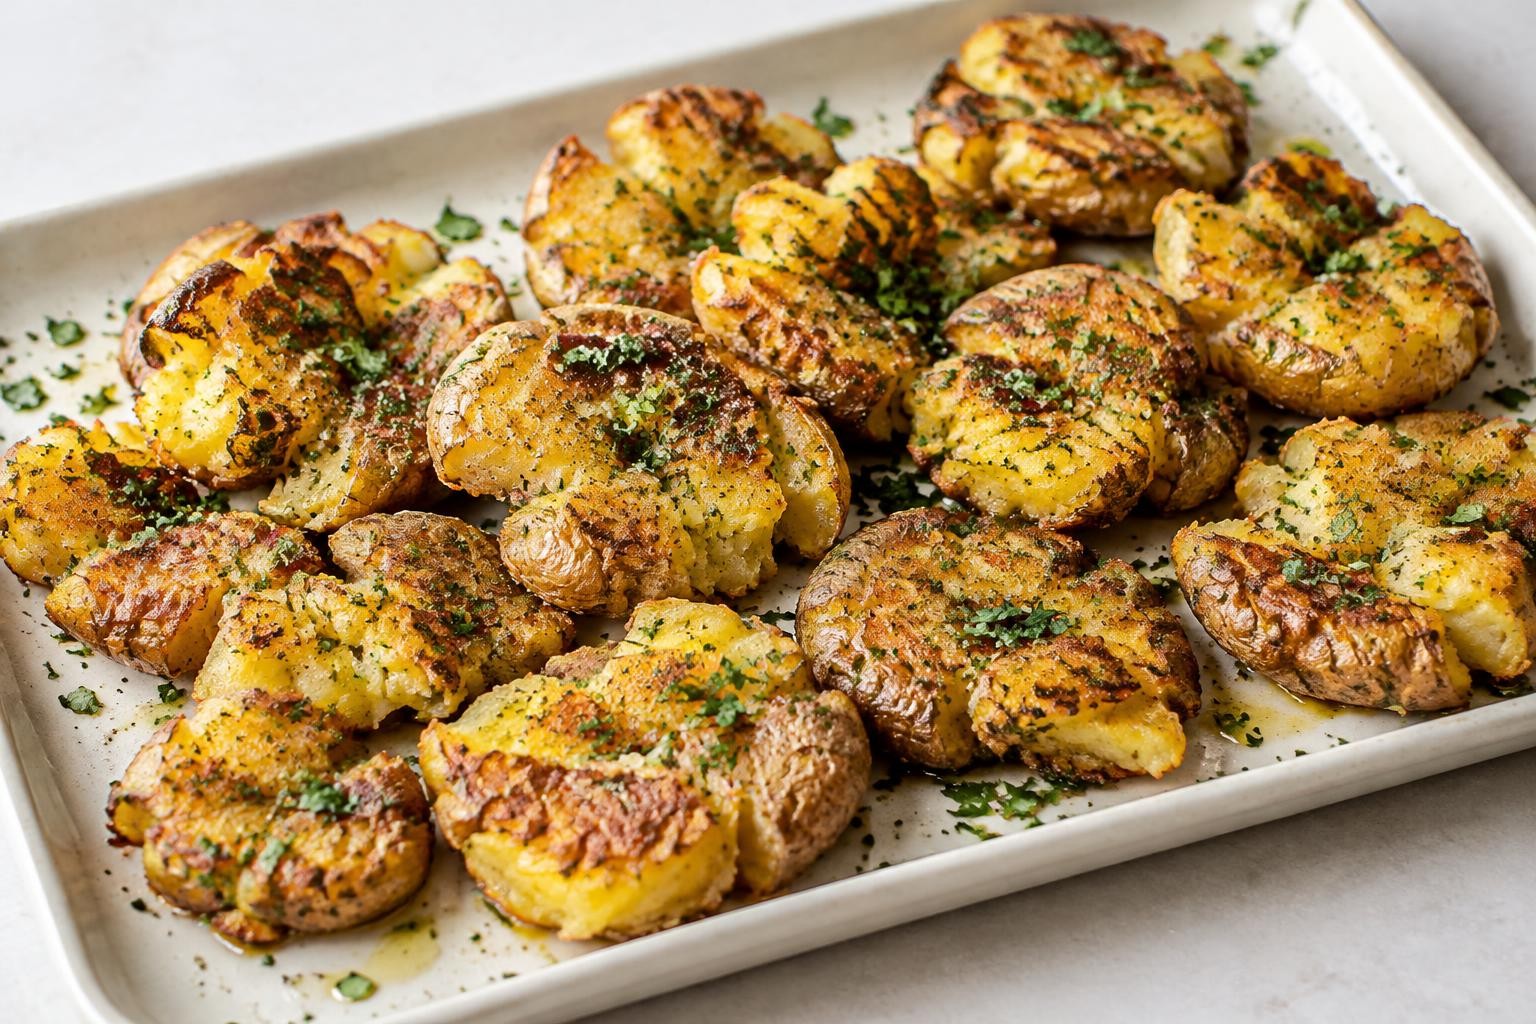
Crispy smashed potatoes are proof that a handful of inexpensive ingredients can turn into a satisfying side dish with restaurant-worthy texture. Each small potato is boiled until tender, pressed gently onto a baking tray, brushed with seasoned oil and roasted until its rough, flattened edges turn deeply golden. The centers stay creamy, while the thin edges become crisp enough to crack under a fork.
Unlike wedges or fries, smashed potatoes are cooked twice. The first stage softens the starch throughout the potato; the second removes surface moisture and browns the many ridges created when you flatten it. This recipe explains both stages, because simply roasting boiled potatoes without drying or spacing them properly often produces soft, pale discs.
This version uses the oven for reliable browning, with a practical air-fryer alternative below. It is written for 750 g of small waxy or all-purpose potatoes, such as baby Yukon Gold or similar varieties. Choose potatoes of roughly the same size so they finish cooking together. The timing will vary with their diameter and your oven, so treat the visual cues as more important than the clock.
Recipe details
- Prep
- 15 min
- Cook
- 45–55 min
- Total
- 1 h 10 min
- Servings
- 4
- Difficulty
- Easy
- Category
- Recipes
- Diet
- Vegetarian; vegan without dairy toppings
- Portion size
- one quarter of the potatoes
Ingredients
For the potatoes
Optional quick yogurt dip
Method
Boil until tender
Step 1: Wash the potatoes thoroughly under running water and gently scrub any dirt from their skins. Choose pieces of similar diameter and remove any damaged spots.
Step 2: Place the potatoes in a saucepan large enough to hold them comfortably. Add cool water to cover by approximately 2–3 cm so they cook evenly as the water heats.
Step 3: Add about half the measured salt to the water. Bring to a steady boil over high heat, then lower the heat slightly so the water bubbles without spilling over.
Step 4: Simmer the potatoes for about 15–20 minutes, checking the smaller ones from 12 minutes onward. A thin knife or skewer should slide through the center without noticeable resistance.
Step 5: Drain the potatoes into a colander and let them stand for 5 minutes. Shaking the colander gently helps excess moisture escape; you want the skins to look mostly dry rather than glossy with water.
Prepare the oven and tray
Step 6: While the potatoes simmer, preheat the oven to **220°C / 425°F** conventional or about **200°C / 390°F fan-assisted**. Position a rack in the upper-middle area for good browning without placing the tray too close to the heating element.
Step 7: Line a large heavy baking tray with baking parchment suitable for the oven temperature, or lightly oil the metal tray. Check the parchment packaging for its permitted temperature; many products have lower limits.
Step 8: In a small bowl, stir together the olive oil, remaining salt, garlic powder, smoked paprika and black pepper. Keep the fresh herbs separate for later so their delicate leaves do not scorch.
Step 9: Spread the drained potatoes across the tray, leaving several centimeters between them. If they do not fit comfortably, prepare a second tray rather than forcing them together.
Step 10: Place the flat bottom of a sturdy drinking glass or measuring cup over one potato and press straight down until it is approximately **1–1.5 cm thick**. Stop before the potato breaks into tiny fragments; repeat with the rest.
Step 11: If the potatoes stick to the glass, lightly oil its base or place a small piece of parchment between glass and potato. Loose pieces are fine: keep them near their parent potato and they will crisp nicely.
Step 12: Let the flattened potatoes stand uncovered for another 2–3 minutes if they still look wet. The more moisture they release now, the less the oven must evaporate before browning starts.
Roast for crisp edges
Step 13: Brush or spoon the seasoned oil over the upper surfaces and into the visible cracks. Try to cover the thin edges as well as the thicker centers.
Step 14: Transfer the tray to the fully preheated oven. Roast for 20 minutes without moving the potatoes so their underside can establish a browned crust.
Step 15: Check the underside of one potato with a thin spatula. It should show golden patches and lift without tearing apart; if it is still pale, leave the tray in for another 5 minutes.
Step 16: Continue roasting for **30–40 minutes total**, until several edges are dark golden and the surfaces feel firm and crisp. Very small or thin potatoes may finish sooner; thick ones can need longer.
Step 17: If one side of your oven browns more aggressively, rotate the tray once during the last 10 minutes. Avoid repeatedly flipping the potatoes, which can break their delicate crust.
Step 18: For extra crunch, move the tray up one rack position for the final 3–5 minutes if there is safe clearance and the edges have not already darkened. Watch closely: crisp can turn to burnt quickly.
Finish and serve
Step 19: Remove the tray from the oven and sprinkle over the fresh rosemary or thyme and parsley. Taste a small edge after it has cooled briefly, then add a pinch of salt if needed.
Step 20: Serve immediately with lemon wedges and the optional yogurt dip. To make the dip, stir yogurt, lemon juice, grated garlic, chopped herbs and salt in a bowl while the potatoes are roasting. Keep the potatoes uncovered until serving to preserve their crust.
Tips
- Dry after boiling. Five minutes in the colander lets steam escape; smashing wet potatoes onto a tray delays crisping.
- Do not underboil. If a knife meets resistance at the center, a potato may split instead of flattening. Cook until a skewer slides through easily.
- Do not overboil. Potatoes falling apart in the water become difficult to press into recognizable rounds. Start checking the smallest ones early.
- Press evenly, not paper-thin. Around 1–1.5 cm creates a good balance between crunchy surfaces and creamy middle.
- Give the potatoes room. A crowded pan is a steaming pan. Use a second tray when needed.
- Use enough oil to coat, not flood. Small visible pools under the potatoes can make them greasy rather than crisp. Brush oil into the fissures instead.
- Season after boiling. Some salt in the water helps the interior, while spices on the tray flavor the crust.
- Add delicate herbs at the end. Fresh parsley and tender leaves burn easily during long high-heat roasting.
- Avoid too much movement. Once a crust begins to form, repeated lifting can tear it away from the potato.
- Serve immediately. Any crisp potato softens as steam migrates from the creamy center toward the crust.
Variations
Parmesan and rosemary
In the final 8–10 minutes, add about 30 g finely grated Parmesan over the potato tops, then continue roasting until golden. Parmesan is not vegetarian in every formulation, so check its production method if strict vegetarian suitability matters.
Spicy smoked-paprika potatoes
Add 1/4 teaspoon cayenne or crushed chili flakes to the seasoned oil. Increase cautiously; the exposed edges concentrate seasoning and can taste hotter than expected.
Lemon and herb version
Omit smoked paprika, finish with finely grated lemon zest and a little lemon juice after roasting, and add chopped parsley or dill. Avoid adding large amounts of lemon juice before roasting because the moisture interferes with crisping.
Mustard-yogurt dip
Stir 1 teaspoon Dijon mustard into the yogurt sauce with a little extra lemon. This provides tang without needing a heavy or sweet bottled dressing.
Air-fryer alternative
Boil, drain and smash the potatoes as directed, but place them in an air-fryer basket with enough space for air circulation. Cook around 200°C / 390°F for 15–22 minutes, checking at 12 minutes and working in batches if needed. Air-fryer models vary substantially; follow your manufacturer's guidance on safe temperature and parchment use.
What makes smashed potatoes crispy?
The secret is not a large amount of oil. It is the relationship between cooked starch, broken surfaces and dry heat.
Boiling makes the potato interior tender and easy to flatten without shattering it. Pressing creates more exposed surface area, especially irregular nooks where oil can cling and heat can concentrate. Once roasted, those thin protruding edges lose moisture faster than the thick center and become crisp.
Two habits make an outsized difference. First, let the drained potatoes release steam for several minutes before flattening. Second, give each flattened potato its own space on the tray. If the tray is crowded, steam becomes trapped between the potatoes, preventing efficient browning.
Choosing the right potatoes
Small potatoes with thin skins are ideal because the skins help hold them together during boiling and smashing. Very large potatoes can also work, but they need longer boiling and create thick centers that take longer to brown. Very floury potatoes may crumble more easily: press carefully and accept some broken pieces, which can become deliciously crunchy.
Aim for potatoes roughly 3–5 cm across. Wash them well, remove any visibly green parts, and do not use potatoes that are extensively green, bitter or spoiled. Keep the skins on for both texture and ease of preparation.
What to serve with smashed potatoes
These potatoes are excellent next to roast chicken, baked fish, grilled vegetables or a fresh salad. Their crispy texture works especially well with foods that provide contrast: juicy tomatoes, bright lemon or a creamy sauce.
For a vegetarian meal, pair them with a bean salad and steamed greens. For brunch, serve with scrambled eggs and sautéed mushrooms. Because they are already generously seasoned, keep the rest of the plate fairly simple.
Storage and reheating
Refrigerate: cool leftover potatoes promptly and store in a shallow, airtight container. Refrigerate within 2 hours and use within 3–4 days at 4°C / 40°F or below. Store dips separately and follow the dairy product's safe storage guidance.
Reheat in the oven: place leftovers on a tray in a preheated 200°C / 390°F oven for about 10–15 minutes, until thoroughly hot and crisp again. Times vary with thickness.
Reheat in the air fryer: reheat in one layer at around 190°C / 375°F for 5–8 minutes, checking frequently. Microwaving warms the center but softens the outer crust.
Freeze: cooked potatoes can be frozen in a single layer before moving to a sealed container, but the texture will not be identical. Reheat from frozen in the oven until steaming hot. Freeze the dip only if its label and ingredients make this suitable.
Troubleshooting
My potatoes are soft, not crispy
They may have been too wet, crowded or removed before sufficient browning. Dry them after boiling, spread them apart and give the oven enough time to develop deeply golden edges.
My potatoes fall apart when pressed
They may be overcooked or the glass was pushed too far. Press straight down with light, steady pressure. Broken pieces are not wasted; place them together and roast them for extra crispy bits.
The garlic tastes bitter
Fresh minced garlic can burn during long high-heat roasting. Use garlic powder in the oven, or add freshly grated garlic to the dip afterward.
The edges are brown but the centers are cold
Potatoes must be fully cooked before smashing. Confirm the knife passes through the middle in the boiling stage, and ensure the oven is fully preheated.
The bottoms stick to the tray
They may need a few more minutes to finish developing a crust or the tray was not adequately coated. Use a thin spatula and good-quality parchment rated for the heat, or oil the tray more evenly next time.
FAQ
Yes. Boil and drain the potatoes earlier in the day, refrigerate them promptly, then flatten, season and roast shortly before serving. They are crispest fresh from the oven.
No. Thin skins help hold small potatoes together and develop a pleasantly crisp texture. Remove individual damaged areas, but leave the rest intact.
No, but small, similarly sized potatoes are easiest. Large potatoes must be cooked longer and may not smash as evenly; cut them only after cooking if necessary and expect a different shape.
Olive oil or a neutral cooking oil both work. Avoid oils with a very low smoke point for this high-temperature oven method, and do not use excessive amounts.
Yes. The potatoes themselves contain no dairy if cooked with oil. Omit the yogurt dip or serve with a dairy-free sauce whose ingredients suit your dietary needs.
You can roast them with very little oil, but the surface will usually be drier and less evenly browned. Oil helps transfer heat and supports the crisp crust.
Serve immediately and avoid covering them tightly while hot. Trapped steam condenses on the surface and softens the crust.
Tray surface area and spacing are essential to this technique. Doubling the potatoes may require a second tray or multiple batches; scaling ingredients without changing equipment would make the timing misleading.
Editorial note: These instructions describe a carefully developed cooking method, not a claim of physical kitchen testing. Oven temperatures and potato sizes vary.
Nutrition
Nutrition information is not available for this recipe yet.
Reviews
There are no reviews for this recipe yet.
TastyFlavors Team
The editorial team behind TastyFlavors, sharing recipes, techniques and inspiration for everyday cooking.