
Recipes
Overnight Oats: 3 Easy Ways for Busy Mornings
Prep
15 min
Cook
0 min
Total
at least 4 h 15 min including chilling
Servings
3
Difficulty
Easy
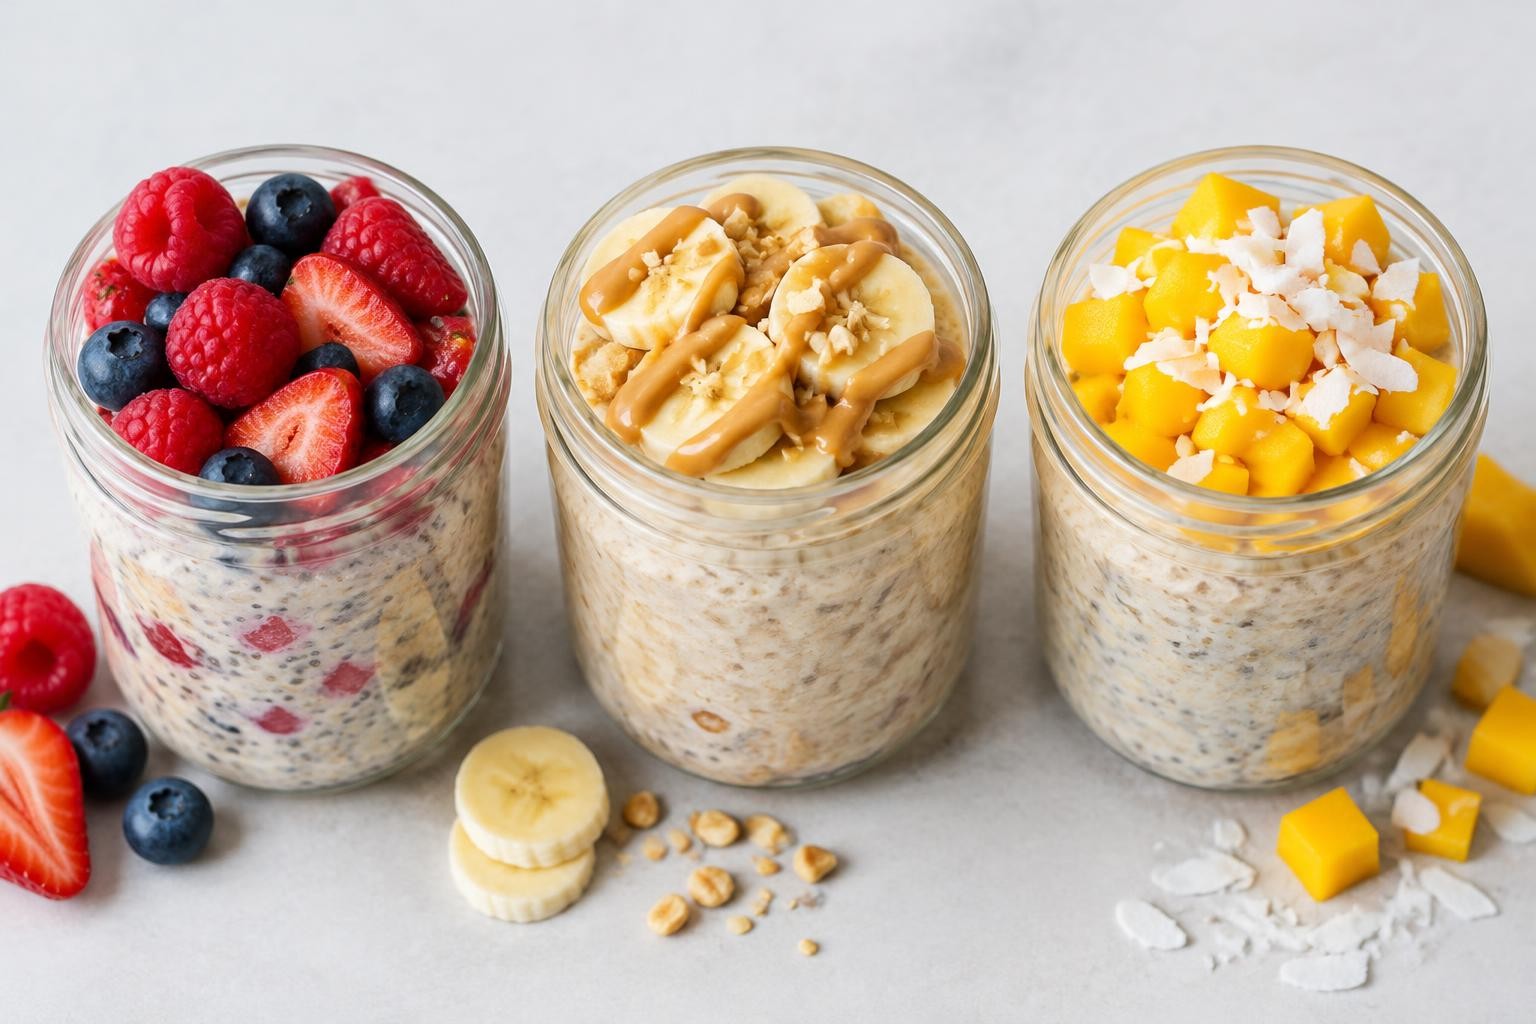
Overnight oats solve a very ordinary morning problem: breakfast sounds like a good idea until there is no time to make it. By combining rolled oats with milk and a little yogurt the night before, you can open the refrigerator to a creamy breakfast that needs no stovetop cooking. The oats gradually absorb liquid and soften into a spoonable texture.
The method is simple, but a good overnight-oat jar still depends on ratio, texture and storage. Too much liquid makes a watery mixture; too little leaves dry flakes. Some toppings, especially bananas and crunchy nuts, are best added just before eating rather than soaking all night.
This guide makes three individual jars from one basic oat mixture, then gives each jar a different flavor: berry and vanilla, banana and peanut butter, and mango with coconut. You can prepare them in one session and choose a different breakfast on successive mornings.
Recipe details
- Prep
- 15 min
- Cook
- 0 min
- Total
- at least 4 h 15 min including chilling
- Servings
- 3
- Difficulty
- Easy
- Category
- Recipes
- Diet
- Vegetarian; adaptable to dairy-free
- Portion size
- 1 jar
Ingredients
Basic oat mixture for three jars
Jar 1: berries and vanilla
Jar 2: banana and peanut butter
Jar 3: mango and coconut
Method
Prepare the jars
Step 1: Wash and thoroughly dry three small food-safe jars with lids, each holding at least 350–400 ml. Clean containers and cold storage matter because the mixture will rest for hours before eating.
Step 2: Measure the oats into a mixing bowl. Check that you are using rolled oats rather than steel-cut oats or flavored instant oatmeal with added sugar.
Step 3: Add the chia seeds and pinch of salt, then stir so the seeds are evenly dispersed rather than clumping in one corner.
Step 4: Pour in the milk, yogurt and vanilla. Mix carefully with a spoon until no dry oat pockets remain.
Step 5: Let the mixture stand for 3 minutes, then stir again. This second stir helps redistribute the chia seeds as they begin to hydrate.
Step 6: Divide the base evenly among the three jars, leaving space at the top for fruit and toppings. Each jar should contain approximately one third of the oat base.
Flavor the first two jars
Step 7: For the berry jar, stir the optional honey or maple syrup into the base before adding the fruit.
Step 8: Spoon the mixed berries over the oats. Frozen berries can be added frozen, but they may release extra liquid and tint the oats as they thaw.
Step 9: Close the berry jar and mark it clearly if preparing for several people with different allergies or preferences. Keep the almonds separate until serving.
Step 10: For the banana jar, stir the peanut butter and cinnamon into the oat base. Mix well so no thick pocket of nut butter remains.
Step 11: Leave the banana slices out for now. Fresh banana browns and softens if submerged overnight, so it is best added when breakfast is served.
Step 12: Close the peanut-butter jar and, if desired, place the optional maple syrup in a separate small container for later.
Flavor the third jar and chill
Step 13: For the mango jar, mix the lime juice into the mango pieces if using. The acidity adds brightness but is not essential for thickening.
Step 14: Spoon the diced mango over the third jar and sprinkle lightly with coconut. If using frozen mango, thaw safely in the refrigerator before eating.
Step 15: Keep the pumpkin seeds separate if you prefer them crunchy. Seeds become softer if soaked overnight with the oats.
Step 16: Seal all three jars and place them immediately in the refrigerator at **4°C / 40°F or below**. Do not leave dairy-containing jars sitting at room temperature.
Step 17: Refrigerate for at least **4 hours**, preferably overnight. The oats will soften and the chia will create a creamier texture.
Step 18: The next morning, open one jar and stir the mixture thoroughly from top to bottom. The texture should be thick but spoonable.
Step 19: If it is too thick, add 1–2 tablespoons of milk and stir again. If it is too loose, add a teaspoon of oats or chia, mix and allow more chilling time.
Step 20: Finish the chosen jar with its fresh topping: almonds for berries, freshly sliced banana for peanut butter or pumpkin seeds for mango. Serve cold, or gently warm a portion only if the ingredients and container are suitable for heating.
Why overnight oats work without cooking
Rolled oats are steamed and flattened during processing, so they soften readily when surrounded by liquid. During refrigeration, the flakes absorb moisture and release some starch, turning the mixture thicker and more cohesive. A small amount of chia seed adds further thickening because the seeds form a gel when hydrated.
The result is not the same as hot porridge: overnight oats retain a little more chew, especially when made with thick rolled oats. If you want a smoother texture, let the jars rest longer or stir briefly before serving. If you prefer a more substantial bite, use larger rolled oats rather than instant oat powder.
The recipe is designed for ordinary old-fashioned rolled oats, not raw steel-cut oat groats. Steel-cut oats stay much firmer with this method and may require cooking or considerably longer soaking; do not substitute them without changing the process.
The basic ratio
For one jar, start with:
- 50 g rolled oats
- 120 ml milk
- 40 g plain yogurt
- 1 tsp chia seeds, about 5 g
This produces a moderately thick breakfast after at least four hours of chilling. Different brands of oats and yogurt absorb liquid differently, so the texture may require another spoonful of milk the next day.
For three jars, multiply the base quantities by three: 150 g oats, 360 ml milk, 120 g yogurt and 15 g chia seeds. Do not add all the fruit at the beginning; each flavor has different storage and texture needs.
Three flavors, three different personalities
Berry and vanilla
Berries bring acidity that cuts through the creamy oats. Blueberries hold their shape, while raspberries break down and spread their color into the mixture. If using frozen berries, expect additional liquid after thawing. Add toasted almonds just before eating for contrast.
Banana and peanut butter
Peanut butter supplies a rich, nutty flavor and makes the oats feel especially satisfying. Cinnamon adds warmth without needing a lot of sweetener. Fresh banana on top gives a brighter flavor and a better texture than fruit soaked all night.
Mango and coconut
Mango creates a sweeter, tropical profile, while coconut adds fragrance and a slightly chewy contrast. A few drops of lime can make the fruit taste more vivid. Pumpkin seeds provide crunch without requiring the jar itself to contain nuts.
Texture troubleshooting
My oats are watery
The brand of yogurt may be thin, or the fruit released extra juice. Stir first; then allow another hour of chilling or add a little rolled oats or chia. Start with less milk next time.
My oats are too thick
Different oats absorb different amounts of liquid. Add milk by the tablespoon until you reach the consistency you like. You do not need to remake the jar.
The chia seeds formed clumps
They may have settled before mixing. Stir once after the first three minutes of hydration. A small whisk can help distribute them.
The oats taste bland
A small pinch of salt and a little vanilla can make a surprising difference. Fruit sweetness varies, so taste before adding honey or syrup.
The banana turned brown
Banana naturally oxidizes after slicing. Add it fresh when serving rather than leaving it inside the jar for several days.
Can you use plant-based milk?
Yes. Unsweetened soy, oat or almond drinks can replace dairy milk, but the thickness and protein content differ. Plant-based yogurts also vary considerably; some are much thinner than dairy yogurt. Adjust the liquid gradually until the mixture becomes creamy.
If you need a vegan version, use plant-based milk and yogurt and replace honey with maple syrup. Check toppings and labels for allergens and cross-contact.
Making overnight oats without chia
The oats themselves absorb enough liquid to soften. You can omit chia seeds entirely, but the mixture may be looser; start with around 100–110 ml milk per 50 g oats, taste the next day and add a spoonful if needed. Chia is optional, not a requirement for safe preparation.
Portion sizes and serving choices
These three jars are moderate breakfast portions built from 50 g dry oats each, plus toppings. Add fresh fruit or extra yogurt if you need a larger meal. The final energy and protein content depend heavily on the milk, yogurt, nut butter and toppings chosen; avoid relying on a generic calorie estimate for all variations.
Overnight oats can also be packed as a snack, provided they stay refrigerated until eating. Use an insulated bag and ice pack if transporting them to work or school.
Storage and food safety
Refrigeration: keep jars at 4°C / 40°F or below. For best freshness, plan to eat within 2–3 days, especially when fruit or dairy is included. Use a clean spoon and reseal immediately.
At room temperature: do not leave dairy-based overnight oats unrefrigerated for more than 2 hours, or 1 hour in very hot weather above 32°C / 90°F. Keep the jars chilled during transport.
Freezing: freezing can change the texture of yogurt and fruit and is not ideal for these assembled jars. If desired, freeze plain oat bases in suitable containers and defrost in the refrigerator, adding fresh toppings afterward.
FAQ
Old-fashioned rolled oats are typically processed with steam and soften by soaking; this recipe does not require stovetop cooking. For different oat types, follow product instructions.
At least four hours usually gives a spoonable texture, while overnight is more convenient. Thick rolled oats may benefit from a longer rest.
Yes, if you prefer warm oats. Transfer the mixture to a microwave-safe container, heat in short intervals and stir. Add delicate toppings after warming rather than cooking them.
Yes, particularly when prepared in clean jars and kept cold. Assemble two or three days' worth at a time rather than leaving fruit-filled jars in the refrigerator for an entire week.
Yes, but they tend to soften into a finer, less chewy texture. Rolled oats give more structure.
You can, but they will soften. Add almonds or seeds just before eating if you want a crunchy contrast.
You can, but the mixture will taste less creamy and rich. Using milk or yogurt adds flavor and changes the overall texture.
The article contains three separately flavored jars. Simply multiplying every ingredient would scale all three variations together rather than allow a reader to choose one flavor; manual adjustments are clearer.
Editorial note: This is an instructional preparation, not a claim of physically tested batches. Actual thickness depends on the oats, milk and yogurt you choose.
Nutrition
Nutrition information is not available for this recipe yet.
Reviews
There are no reviews for this recipe yet.
TastyFlavors Team
The editorial team behind TastyFlavors, sharing recipes, techniques and inspiration for everyday cooking.